
Define Attribute Values
To access this screen:
-
Setup ribbon >> Model >> Attributes >> Values tab.
-
Reserves ribbon >> Mining Blocks >> Attributes >> Values tab.
-
Reserves ribbon >> Reserves >> Attributes >> Values tab.
This panel is used to assign attribute values to a new attribute (as defined using the respective Attributes tab). The same controls are available when applying attribute values to the input model, mining blocks or the reserves table.
Note: If you aren't familiar with Studio's expression syntax, it is recommended that you review the various help topics available before you start to configure mine planning attributes: The EXTRA process, Expression Translator, Expression Builder, and Logical Expression Examples.
Use this screen to define the values that will be set in either the input model, reserves table or mining blocks file for evaluation purposes.
This panel is split into the following key areas:
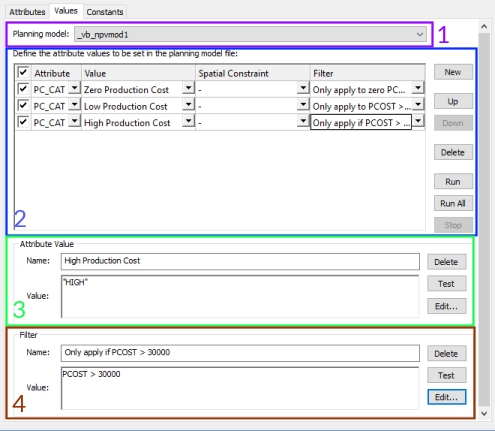
Click New to define a new attribute value, using the following properties:
- Planning model – Only available when setting up attributes for the input planning model, this drop down list will contain all block models that have been defined for the project.
- Value Table – Assign attribute values to a new attribute, or update an existing attribute in the model, blocks or reserves table. The following fields are shown:
- Attribute – Select the user attribute from the drop-down list. Only attributes created using the Define Attributes panel will be available for selection.
-
Value – Once an Attribute has been selected (see above), you can start to define a value.
The easiest way to do this is to enter a value or expression directly into the table. You can use any valid EXTRA expression including referencing existing model, blocks or reserves table attributes, or using conditions. To enter a value, just click in the Value field, then populate the Attribute Value field below, which becomes active, for example:

If you are not using a named value definition (see below) the two areas above will be identical - updates in one will force the same update in the other. In fact, if you want to define your values and filters using the table alone, you can do that. The editing area below allows you to access editor tools and test values and filter expressions.
You can also store values or value expressions with a more recognizable label. This is done by creating a "Named Value Definition". To do this, select the drop-down list to select <New named value...>, or any existing value if you wish to edit it. You can then use the Attribute value group (3) to define the value for the selected attribute.
Note: There is an example of both direct input and named value definitions below.
-
Filter – Define a label for an expression that will be defined to derive the value. Filters can be applied to any defined attribute.
As with the Value field, you can enter a filter expression straight into the table. The specified Value (see above) will be applied to all records that pass the filter. If you want to store your filters with a different label, you can create a "named filter": select <new named filter> to define a new filter expression using the Filter group (4).
In either case, you use the Filter Value field at the bottom of the panel to construct your filter expression.
In summary, there are three ways that you can use the Values tab. You can either:
- Enter value definitions directly
into the Value field.
This must be either an explicit value - text in quotes - or it
can be the name of a variable already in the model, or it can
be an expression (say,
FIELD1+FIELD2*100). Similarly you can enter a filter expression into the Filter cell directly - this defines the scope of value application. - You can create named value definitions and filters by selecting the <new named value> or <new named filter> options. This allows you to label your value or filter with a suitable summary description, which may make it easy to re-use them for future value definitions.
- Enter an Attribute value as an expression that can apply to multiple attributes. In this case, you simply use the Attribute value field to create a complex expression and set the Attribute as absent [-].
Note: Examples are shown below. You can use any combination of the above methods to prepare your model, mining blocks or reserves data.
Setting Attribute and Filter Values
Once high-level details for a value have been created, using the topmost table, you can define how the value is constructed: this could be an explicit value for all data records or an expression that derives values from other calculations and/or attributes.
Named values, once defined, are available for use on any Attribute Values forms (Model, Mining blocks and/or Reserves Table).
Attribute Value Controls
The Attribute Value
group is used to define an expression that describes the value
for each record in the database (for that attribute). A very simple
example would be to set the Value field to "10", meaning
that is the value for all records in the table that are not filtered
(see below).
In this example, the input model contains an AREA numeric field. A new DRILL attribute
is required that is a proportion of the area, with the same proportion
being applied for each record. In this case, the Attribute
Value Name is DRILL and the Value
is:
AREA*20*0.002
You can set up a filter using Edit. This launches the Attribute Value Editor, from which you can construct an expression to define the values of your attribute. These expressions can be as simple or complex as you like. If you have already created a named value definition, you can also use the specified Name within your expression.
You can Test the expression to make sure it is valid. Then you can either apply the current attribute by selecting it in the topmost table and selecting Run to apply it to the model with the calculated values, or create a batch of values and assign them together using Run All.
You can also choose not to specify an Attribute ( set the value as absent [-]) and use a more complex value expression that references the attribute(s) to be considered. If you do this, you can create any expression in the Attribute Value field (either named or direct) and it will be applied to the table as a whole.
For example, you could specify the following:
Clicking Run or Run all would set PCOST to zero for phase 5 if it was previously non-zero (effectively wiping production cost records for that phase). As the target attribute is defined in the expression, there is no need to specify one in the table above.
A named value can also include a reference to another named value. For example if you wanted to create a PROJECT attribute that concatenates the string expressions PIT, PHASE and BENCH, you could use an Attribute value called Full Context, represented by:
PIT+"_" + PHASE + "_" + BENCH
Subsequently, if you wanted to create a separate attribute (named "FULL_ID" that prefixed the concatenated string above with a BLOCKID, you could either create a new Attribute value:
PIT+"_" + PHASE + "_" + BENCH
	 + "_" + BLOCKID
Or you just reuse the original expression:
[Full Context] + "_" + BLOCKID
Once a named value has been referenced, there are implications for
deleting it afterwards (see Deleting
Named Values, below).
A named value can also include a reference to one or more constants (defined on any Constants panel).
Constants are very similar to named expressions in that they can be used to reiterate a given expression or calculation. See Constants.
Filter Controls
The Filter group can
be used in cases where a value should only be applied to a subset
of records in the model.
This may be useful if you wish to apply a particular production
attribute (for example, a revised production cost for a given
destination, or you wish to set a particular MINED flag for specific
rock types above a specified cutoff). In other words, the Filter
is used to determine the scope of records to which the Attribute Value is applied.
As with Attribute Value
settings, you can Test
your filter. When you wish to commit this filter (that is, apply
the Attribute Value(s)
to the records that pass the filter test) you can click Run or Run
All (see above).
Deleting Named Values
Named values are an abstraction of the expression they contain and are a neat way to categorize and organize your value expressions.
If you reference a named value in another expression, and you delete that named value, you will need to confirm your action.
If you decide to delete a referenced named value, the actual expression used by that value will be transposed into the current value. The expression that is transposed will be wrapped in brackets.
A simple example:
-
Create a named expression called "Named 1". It contains the expression
4+5. -
Create a named expression called "Named 2" and reference the first expression, but double it:
[Named 1]*2 -
DeleteNamed 1 using the Values panel. Confirm this is OK.
-
Named 2 is then automatically updated to show the Attribute Value:
4+5)*2
Worked Examples
Example 1: Adding a new attribute and conditional values directly
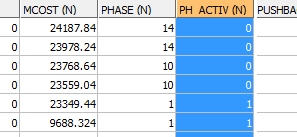
You have a PHASE attribute in your model, and you wish to create another attribute called "PH_ACTIV" to show "1" for phases below phase 5 and 0 for phase values that are equal to 5 or higher:
- Create an attribute called PH_ACTIVE (numeric).
- On the Values tab, create a New value using the PH_ACTIV Attribute.
- In the Value column enter "1" (without quotes) - no need to create a labelled value this time.
-
In the Filter field, enter "PHASE<=5" (without quotes). You should see the following table entry:
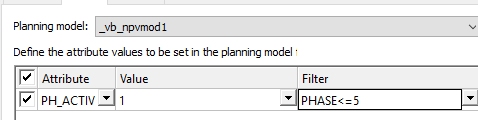
- Click New and enter a 2nd table entry, also reference PH_ACTIVE. This time set the Value to "0" and the Filter to "PHASE>5".
-
Click Run.
The model is updated to include a PH_ACTIVE field, which will include the value "1" if the phases is less than or equal to 5, and 0 if it is higher than 5:
Example 2: Applying a new attribute and conditional values using named values
In this example, your model includes a calculation production cost field. You wish to use a series of expressions to conditionally flag each record with either a "ZERO", "LOW" or "HIGH" cost indicator based on a threshold dollar value for each bin. This will be represented by attribute PC_CAT This will allow you to report reserves for all records with a non-zero production cost later on.
You could do this by entering value and filter data directly into the table as in the preceding example, but in this case you're going to use a set of named (and re-usable) "named values".
- Create an attribute called PC_CAT (alphanumeric, length 16).
- On the Values tab, create a value using the PH_CAT Attribute.
- In the Value column, select <new named value> from the drop-down list.
- In the Attribute Value group, enter "Zero Production Cost" as the Name.
-
You want to set the value ZERO in the table when a condition is met, so just enter "ZERO" (including quotes - this is an alphanumeric value) into the Value field:
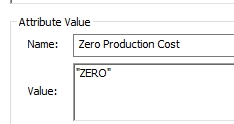
- Click Test to make sure the expression is valid.
- Next, create a named Filter by selecting <new named filter> from the Filter drop-down list.
- Replace the Filter Name so that it reads "Only apply to zero PCOST".
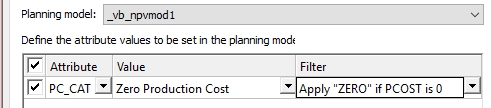
- You want to apply "ZERO" to the PC_CAT alphanumeric attribute wherever PCOST is zero.
- Click Edit to display the Expression Builder.
- Pick PCOST from the Variable Selection list and click Select Variable.
- Click =.
- Type "0" (zero) at the end of the Expression.
- Click OK to transfer the filter expression back to the Values tab.
- Click Test - the expression is valid.
-
The table should now look like this:
- Add a New value definition using the same PC_CAT attribute
- In the Value column, select <new named value> from the drop-down list.
- In the Attribute Value group, enter "Low Production Cost" as the Name.
- As before create a named Filter by selecting <new named filter> from the Filter drop-down list.
- Replace the Filter Name so that it reads "Only apply to PCOST >0 <30000".
- You want to set the value LOW in the table when a condition is met, so just enter "LOW" (including quotes - this is an alphanumeric value) into the Value field.
- Select <new named filter> as before, and call it "Only apply if PCOST > 30000"
-
Enter the following filter expression directly into the Filter Value field:
PCOST > 0 AND PCOST < 30000
-
Finally enter a 3rd named value to the table using New. This time, call it "High Production Cost", using a named filter ("Apply HIGH is PCOST >= 30000"). The value to be applied is "HIGH" and the filter expression is:
PCOST > 30000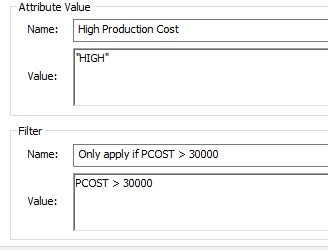
-
You should now have 3 entries in the table:
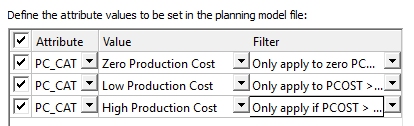
-
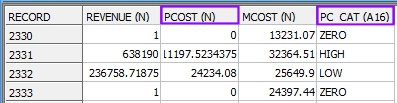
Click Run All. The model is updated to include a PC_CAT field, which will include the values "ZERO", "LOW" or "HIGH" depending on the PCOST value:
Related topics and activities: